A "Project" is a set of activities which ends with specific accomplishment and which has (1) Non-routine tasks, (2) Distinct start/finish dates, and (3) Resource constraints (time/money/people/equipment).
"Tasks" are activities which must be completed to acheive project goal. Break the project into tasks and subtasks. Tasks have start and end points, are short relative to the project and are significant (not "going to library", but rather, "search literature"). Use verb-noun form for naming tasks, e.g. "create drawings" or "build prototype". Use action verbs such as "create", "define" and "gather" rather than "will be made". Each task has a duration. Very difficult to estimate durations accurately. Doubling your best guess usually works well.
"Milestones" are important checkpoints or interim goals for a project. Can be used to catch scheduling problems early. Name by noun-verb form, e.g. "report due", "parts ordered", "prototype complete".
Your plan will evolve so be flexible and update on a regular basis. It also helps to identify risk areas for project, for example, things you don't know how to do but will have to learn. These are risky because you may not have a good sense for how long the task will take. Or, you may not know how long it will take to receive components you purchased for a project.
A work breakdown statement (WBS) is a categorized list of tasks with an estimate of resources required to complete the task. An example WBS appears below.
| WBS # | Task Description | Est Person -Hrs | Who | Resources | M&S |
|---|---|---|---|---|---|
| 5 | Profile motor power | ||||
| 5.1 | Design test stand | 20 | SE, JM | Pro/E | |
| 5.2 | Build test stand | 15 | SE, JM | Frame & brake parts | $35 |
| 5.3 | Test 3 motors | 3 | SE, JM | Stroboscope | $75 |
| 5.4 | Plot torque vs. speed | 2 | JM | Excel |
(M&S = Materials & Supplies)
Gantt charts are a project planning tool that can be used to represent the timing of tasks required to complete a project. Because Gantt charts are simple to understand and easy to construct, they are used by most project managers for all but the most complex projects.
In a Gantt chart, each task takes up one row. Dates run along the top in increments of days, weeks or months, depending on the total length of the project. The expected time for each task is represented by a horizontal bar whose left end marks the expected beginning of the task and whose right end marks the expected completion date. Tasks may run sequentially, in parallel or overlapping.
As the project progresses, the chart is updated by filling in the bars to a length proportional to the fraction of work that has been accomplished on the task. This way, one can get a quick reading of project progress by drawing a vertical line through the chart at the current date. Completed tasks lie to the left of the line and are completely filled in. Current tasks cross the line and are behind schedule if their filled-in section is to the left of the line and ahead of schedule if the filled-in section stops to the right of the line. Future tasks lie completely to the right of the line.
In constructing a Gantt chart, keep the tasks to a manageable number (no more than 15 or 20) so that the chart fits on a single page. More complex projects may require subordinate charts which detail the timing of all the subtasks which make up one of the main tasks. For team projects, it often helps to have an additional column containing numbers or initials which identify who on the team is responsible for the task.
Often the project has important events which you would like to appear on the project timeline, but which are not tasks. For example, you may wish to highlight when a prototype is complete or the date of a design review. You enter these on a Gantt chart as "milestone" events and mark them with a special symbol, often an upside-down triangle.
Gantt charts made with Excel are easy to update and maintain. Here's how to do it.
On a piece of scrap paper, make a list of tasks and assign each task tentative start and stop dates (or durations) and the people responsible for the task. Also list important milestones and their dates. If you have more than 15 or 20 tasks, split your project into main tasks and subtasks, then make an overall Gantt chart for the main tasks and separate Gantt charts for the subtasks which make up each main task.
Decide what resolution to use in the timeline. For projects of three months or less, use days, for longer projects use weeks or months, and for very short project use hours. For these instructions, we will assume you have chosen a resolution of days.
Fire up Excel. Under Page Setup, select landscape orientation, and then select the options to center the chart horizontally and vertically on the page. Also under Page Setup, activate the "fit to one page" button. (Note that if the text comes out too small, you may have to print your chart on two pages and paste together. Even better, adjust the resolution of your date scale or drop less important tasks to make your chart fit comfortably on one page.) Still under Page Setup, set header and footer to be blank. (It's better to write the title right on the spreadsheet rather than use the header for the title. Finally, under Page Setup, turn off the option to print gridlines.
Set up the cells. You can use the sample (found elsewhere on this web page) as a guide. Use the border command to draw boxes around the appropriate cells. Enter your scheduling data. To make the gray bars which indicate length of task, select the appropriate cells, then the fill command (one of the buttons near the top).
As the project progresses, fill in the gray bars with black to denote the fraction of a task that is complete.
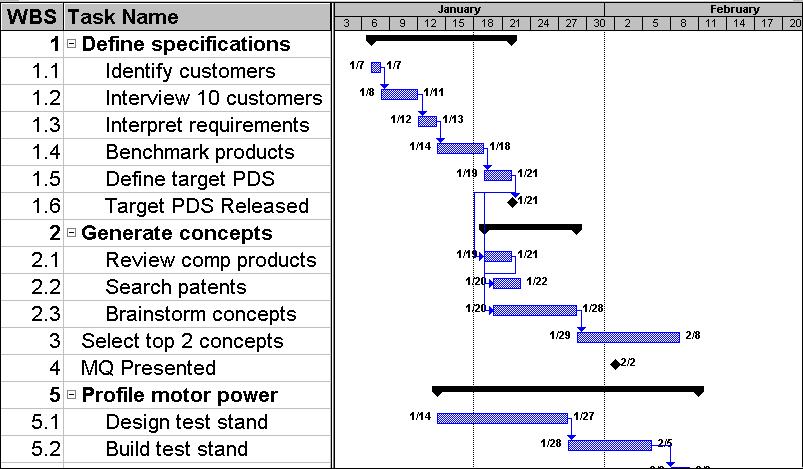
You can also create Gantt charts using a project managment computer package. A sample chart made using Microsoft Project appears below. Project is the most widely used scheduling tool for small projects. It is available on the PC's in MechE 308 for use by IT students.
Here are some feedback comments given after a first round of Design Projects Gantt charts was submitted. Check against your Gantt Chart before publishing:
General Notes on the first Gantt charts submitted: 1. Perhaps try using MS Project. 2. Customize to your particular project. For example, if you are constructing a prototype, show shop time, Pro/E time, etc. 3. If ordering parts, do so as soon as the BOM is complete. Getting parts can take 2 weeks, sometimes longer. 4. Add presentation prep task(s), report prep task(s) 5. Add project title, list of team members. 6. Things like "Concept selected" could be an important milestone to add. 7. Show a concept design phase, a detailed design phase and a test phase for the project. 8. Should show more detail on design tasks, less detail on reports/documentation/presentation tasks. Should have about 3/4 design tasks, 1/4 documentation/presentation related tasks.